By default, you define your message transformations in BizTalk using the BizTalk Mapper, a unique tool which uses connectors and “functoids” to construct your logic.
The mapper is quite powerful, but is another mechanism that has to be learned carefully. Beyond the basics, it’s not very intuitive and doesn’t always work the way you might guess. It can also quickly look very messy if you aren’t careful, or don’t make good use of the tabbing feature.
If the mapper isn’t right for you, there’s another option: Custom XSLT. Here’s how to set it up.
BizTalk allows you to write your transformations directly in XSLT (it’s worth noting that anything you write in the mapper gets compiled to XSLT anyway). There are a couple of reasons this can be a better option than the mapper.
First, unlike the mapper, XSLT is not unique to BizTalk. It’s therefore a reusable skill that you or your team may already have. Secondly, if you’re familiar with coding at all, XSLT uses flow, comparison and looping mechanisms that are based on programming, and tend to be very familiar to developers. The basics are easy enough to pick up, and you can write complex logic much more efficiently if take direct control of the XSLT.
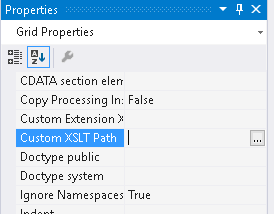
To write your map directly in XSLT, first open it in Visual Studio. Here’s the bit that’s easy to miss, you have to click on the background of the mapper (the grey-on-white grid) to select it. This gives you properties that aren’t available elsewhere. With the background selected, you should see the property Custom XSLT Path. Here you can specify an XSL file.
Warning: If you specify custom XSLT, it will completely override anything you’ve already set up in the mapper. This can be very misleading when you open a mapper that looks wrong, only to find that’s because it’s being ignored in favour of custom XSLT.
It’s best to start your XSLT file by generating it from your existing BizTalk .btm map, even if you haven’t applied any mappings yet. That way the document headings, source schemas, and destination schemas are all set up for you. This is easy to do, but just bear in mind that any existing transformations you already specified in the .btm will not be very reader-friendly in the machine-generated XSLT.
To create the starting XSLT, just right-click the .btm file in Visual Studio’s Solution Explorer, and choose Validate Map. Once validation is complete, read the Output window text. It provides a link to the XSLT that was created when the map was compiled, which gets you off to a good start.
After that, it’s down to you to update the XSLT file with your mappings using typical if-then-else logic, foreach loops, and other approaches standard in most languages. Personally, I find W3Schools covers the basics well.
Good luck!